Blog Archives: Articles
Brownie Flash III on Fuji Acros 100
There isn’t an outing in this house that doesn’t involve at least four cameras each (per adult) and one each for at least three of the children… That’s a *lot* of cameras…
And there’s a danger with this modus operandi: one tends to forget which camera does or doesn’t contain film.
I had assembled my photographic equipment for our walk the other day: my Halina Paulette, Bencini Comet IIS and my Lomo Lubitel 2, when another appeared on my ‘pile’ – a Brownie Flash III. I asked Jem if he’d put it there and he told me he’d noticed it had a ’4′ in the red window. Eek! That meant it had film in it and I had no recollection whatever of when or where I had loaded it and taken the first four shots. The only thing I did know (because it was another of our ‘live and learn’ moments) is that it was loaded with Fuji Acros 100… because I had put a sticker on the bottom of it saying so.
So, now that we’re up and running with our own developing, it seemed prudent to finish the film as quickly as possible and get it processed.
Of the mere eight shots that a roll of 120 yields from a Box Brownie, only four and a bit really came out. Despite the fact that the camera had been stored in its original canvas case, the film had still deteriorated and there’s serious fogging throughout, totally destroying two shots, making the third unusable, but the other five came out with varying degrees of success.
My lessons for today, then, are:
- Remember which camera is loaded.
- Make sure you use it till it’s done.
- If you store it for a while without using it, make sure you cover the red window with electrical (or similar) tape.
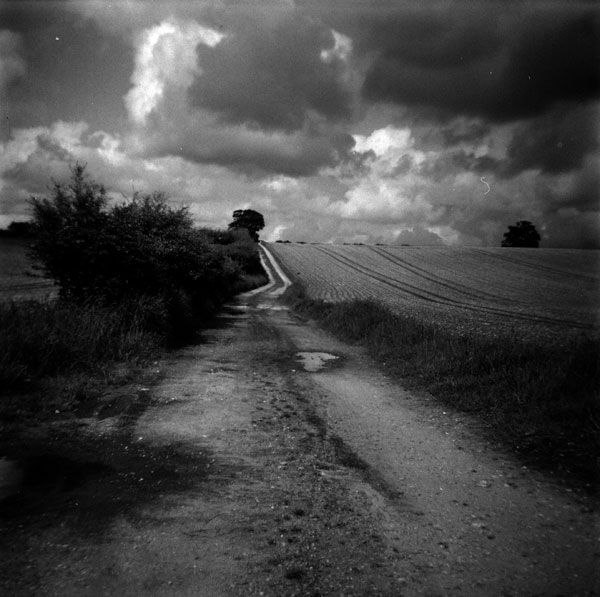
One of them, however, came out beautifully in spite (or maybe because) of the deterioration. One of our favourite photographic spots:

Cathedral Cloisters
Ensign Ful-Vue Super in Monochrome
After the roaring success of the Ful-Vue Super in colour (Ektar, to be precise), I decided to give it a go in black and white. So I filed down a roll of Ilford HP5 120 film to fit (it being a 620 medium format camera), loaded it up and off I went. (Home-developed in Ilford LC29 and home-scanned).
The results can be found here. But here are one or two to be going on with:
My favourite walk

Jem and Juno

Pushchair escapee
The only problem I had is that once again it began sticking and slipping at around exposure 4, and by number 10 I had to give up winding on, so I have lost 2 shots per roll so far. And on a roll of film that only contains 12 exposures anyway, that’s a pricey fault!
I suspect that the culprit is the filed down 120 film. 120 comes on a much thicker spool and I don’t think the more streamlined mechanism is coping with it at all well, so for the next roll, I’m going to have to attempt respooling 120 film onto a 620 spool. I am assured that once you’ve got the hang of it there’s really nothing to it…
*gulp*
![]()
Wish me luck!
Bencini Comet IIS loaded with 35mm Fujicolor C200
Once again, a steep learning curve ![]()
It wasn’t until I’d developed the film that I realised how much of the shot you lose to the top and bottom when shooting 35mm in a 127 medium format camera. So I’ve lost heads and feet… But, fortunately, most of the shots I took were either landscapes or far enough away not to be too significant.
This was a seriously fun experiment.
I’ll talk you through it.
I started off with a dark-bag, a canister of 36 exp Fujicolor C200 film, a 127 spool and used roll of backing paper, scissors, an empty plastic film canister, and a length of string with which to measure the amount of film I needed for the roll. I had already marked the backing paper with masking tape where the film needed to begin and where it would end and, in the dark-bag, I used that tape to fix it to the backing paper. I opened the canister, used the string to measure out the amount I needed, cut it off the rest of the roll and put the remainder into the black plastic film pot (which I marked with its contents). Then I fixed it, as mentioned, to the backing paper and wound it on to the spool. Which is all jolly good fun and gives a whole new lease of life to the expression ‘fumbling in the dark’.
Once it was wound really tight, I could use a little more masking tape to secure it, and then it was ready to load into the camera. A friend-in-the-know (that’s you, Juliet) mentioned that, since the 35mm is a more sensitive film, you need to cover the red window with some dark tape (I used electrical tape) and peel it back in subdued lighting in order to wind the film on to the next frame. This worked well.
Here are a couple of the shots (you can find the rest here and, for the sake of a laugh, if nothing else, I have included the headless shots ![]() ):
):

Teddy running free

The Old Station House
Bencini Comet II S and Rollei 80s Retro 127 film
Well, you live and learn. ![]()

Bencini Comet II S
I got ridiculously excited about this camera partly, I suspect, because it is *so* beautiful. Bright and shiny and small, with smooth motion and very simple mechanisms. But each time you use a new camera you are, of course, unaware of its capabilities or limitations.
This camera and film combination, I have discovered, is not much good for taking pictures of people. But photographs of architecture, under the right conditions, can be lovely. The lens on my copy is not very sharp, nor the focusing very accurate or easy, but I suspect that beautiful results could be achieved with a rich colour film and some woodland / countryside.
Out and about in Norwich yesterday, I saw this chalkboard and the one in the shop window and thought them rather charming. This, I believe, is one of the shots that came out best.

St Benedict's, Norwich
This one, too, I liked, of the Belgian Monk and the church next to it.

The Belgian Monk, Pottergate, Norwich
The rest of the roll can be found here.
I have just done something that felt rather brave and risky. In a dark bag, I spooled some 35mm film onto a 127 spool and backing paper, and I’ve loaded it into the Comet. Another experiment in the offing… ![]()
Ensign Ful-Vue Super – the results are in!
I wrote about the Ensign Ful-Vue before. In short: saw it, loved it, used it, was totally underwhelmed by the results.
 Then Jem surprised me with an Ensign Ful-Vue Super; a slimmer, smaller, more streamlined version with a twisting focusing lens and viewfinder cover. Whilst I appreciated its obvious beauty, I’d been seduced and disappointed by its predecessor, so I approached this one with a little more reticence. I filed down a 120 roll of Kodak Ektar to fit, as it takes 620 film, loaded it up and off we went.
The only real problem I encountered is that the take-up spool began slipping before I was halfway through the film. By exposure 10 neither gentle persuasion nor brute force was going to budge it. Since it was loaded with Ektar and we haven’t got as far as home-developing colour film yet, we were taking it to the shop for a develop only, and I was tasked with removing it from the camera and putting it in a light-tight case inside a dark-bag at the shop counter. This, I discovered, was a very different experience from the privacy of my own kitchen table! Thankfully, it went without a hitch, and when we examined the camera afterwards, it was quite obvious that the pins that turn the take-up spool have bent upwards and are no longer gripping effectively. Jem assures me this won’t take much to fix. ![]()
So home we went to scan our films and I was incredibly happy with the results.
This is the portrait I attempted, bright sun outside, in our bedroom window, my eldest son. The tones, colours and sharpness were a real surprise. I should add that I don’t believe it has a light-leak, in spite of the fact that this exposure appears to have one. Rather, I believe I left the counter window open in bright sunlight, which has flooded this shot somewhat. Oops! You live and learn, eh? ![]()

Ensign Full-Vue Super, Kodak Ektar film
And here is an example of how well it works in a sun-flooded room:

Ensign Ful-Vue Super, Kodak Ektar. A sunny June Saturday.
It also has a lovely quality when photographing buildings:

Recommissioned church in Norwich. Ensign Ful-Vue Super on Kodak Ektar
You can find these and some other shots from the roll here.
Makeover time!
The Halina Paulette I have just posted about was, frankly, a little shabby in the fabric department. So, since I have rather fallen for this camera and have no intention of parting with it in the remotely near future, I have given it a makeover.
Having pulled off (with great ease actually) the black leatherette, I used it as a template for the fabrics with which I covered it. I have a *lot* of crafty bits and bobs lying around, and the front is now covered with some upholsterers tape taken from a book of samples I picked up years ago. It has provided a lovely, tactile surface for picture taking. ![]()

I managed to find a fabric to compliment the colours, with which I have covered the back. I used bookbinders glue (basically quite a thick PVA) to stick them down and, when that was dry, applied a layer of Mod Podge to the outside to make them at least a little water-resistant and wipe-cleanable.
 Now I need to work on resisting covering everything else in sight. It would be wise not to stand too still around me.
 ![]()
(And after all this, I’m hoping the light-leak repair worked!)
Ensign Ful-Vue – or – don’t judge a camera by its looks…
I’ve come to a realisation lately. I have been seduced, endlessly, by the beauty of old cameras, but the truth is a universal one:
Don’t judge a camera by its looks. ![]()
I have been disappointed by two notably: The Kodak Brownie Reflex 20 and the Ensign Ful-Vue. The fact is that they have utterly stunning viewfinders but the end results – the shots themselves – are totally underwhelming. If a photograph looked like its image in the viewfinder, if the judging of the camera were that simple, wouldn’t we all be incredible photographers!
The Ensign Ful-Vue has possibly the most beautiful viewfinder I’ve yet seen. I was wildly optimistic when I took it for its test run, and I restored it lovingly before I had seen the results, the best of which I am posting here.

Village View

St Giles Church, Norwich

Clouds

Rural Norfolk
Conversely, the Halina Paulette, which looks a little like a toy camera and has an innocuous and unconvincing shutter sound, not to mention the most pathetic little viewfinder which has no bearing on the lens either (manual focus according to distance from subject), can produce some stunning results.
So… the moral of the story?
Well, actually, there isn’t one! The Lomo Lubitel2 has a beautiful viewfinder and produces gorgeous results, so… at best the moral is: don’t be attached to the results – just suck it and see. ![]()
The Halina Paulette

Camerapedia says of this camera:
“The Halina Paulette was a 35mm viewfinder camera made in Hong Kong by Haking. It was introduced in c.1965, with a 45mm/f2.8 lens in a 4-speed (1/30-1/250) + B shutter. “
Yesterday I developed a roll of Kodak TX400, the first I have put through this particular camera. And I developed it with some trepidation.
 First off, the shutter makes such an unassuming noise, I was convinced it didn’t work. These two shots (which made me laugh out loud when I scanned them) are evidence that I was still looking through the lens to ascertain any aperture movement at all…
 ![]()
 Then there was the problem of the camera-back, which seemed to me to be terribly loose. So I couldn’t be entirely sure the film hadn’t been completely light-flooded. My particular copy (which is rather a beautiful thing, I’m sure you’ll agree) has its own original case. So I decided to leave it in it, cumbersome as that might be, so as to minimise light-leaks. This worked to a degree, but as even these two shots show, it was very limited success, and some shots were too damaged to be viewable.
However, for me, shots such as this:
 Or this:

Or even this:
 demonstrate its great potential.
So here is a gallery of these and the remaining shots, and now I shall be attempting to fix that light-leak, loading her up with another roll of film, and having another go! ![]()

Fed 4, Jupiter 11, Tokyo Optical
 Over the last few days I have finished up film from the Gakkenflex, the Kodak Cresta II and the Voigtlander Brilliant (which had a mishap recently but still seems to be functional). My intention is to sell the Brilliant and put the funds towards a Yashica Mat TLR.
I have a Mamiya EE to test, not a very exciting camera, but you can pick them up for a couple of bucks apiece and, worst case, take them apart for the hardware. It can cost you twice as much to buy a small bag of camera screws on Ebay. And I picked up a Fed 4 body (for 99p) onto which I’ve fitted an old Jupiter 11 lens and a Tokyo Optical viewfinder, it looks kind of amazing (pictured). Soviet era cameras are always gratifying, for the experience as much as the results.
I am also cutting down a roll of Fuji Pro400 to put it into the Duex. It will be so precious to see the result of this sublime art-deco era lens on such a rich, smooth film stock.
